Tuesday, November 28, 2017

Peter Pan

Well, I finally finished the last paper pieced block late last night.  I still need to add some embroidery to it, but, that is the easy part.

I would have been done sooner, but, I made another stupid mistake.  This pattern is 'colored' on the back, and the designers background is a light green (mine is a white on white).  Instead of double checking each piece, before I added it, I just added green fabric to 3 places on one of the pieces of Peter Pan.  Oops!  If I'd been paying attention, and checking like I should have been doing, I would have noticed that those 3 pieces were supposed to be background pieces.  Seam ripper to the rescue. 
pattern

my mistakes, with dark green where the white was supposed to go

Here is the block, corrected.
correct Peter Pan block

both blocks (sorry for the bad color picture)

Peter just needs his nose embroidered on now.  This block was designed by Michelle Thompson, and can be found here.

The next part is the crocodile, that will be across the bottom of the quilt.  I found a great pattern at Sew Fresh Quilts to use, called Crocodile Rock, at her Etsy shop.  Lorna has some great patterns.  Here is a picture of the pattern that I'm going to use.  I'm only going to make one crocodile.
Crocodile Rock pattern

I'm headed off, as soon as this posts, to find some fabric for the crocodile. 

Here are some of the other fabrics that will probably show up in this quilt.
treasure map and nautical fabrics

Tinkerbell fabrics

I need to get this quilt top finished, so that the long arm quilter can do her part. 


Sunday, November 26, 2017

Smee

Woohoo!  I'm on a roll!  I finished piecing both Smee blocks last night.

paper pieced Smee blocks

Smee is a free pattern on Fandom in Stitches.  As you can tell from the pattern picture, Smee needs some embroidery to finish him off. 

paper piece pattern

Also, since I'm using a white on white background, not the blue, like in the pattern picture, and Smee has white whiskers, I needed to add some embroidery to mark the different 'whites'.  I added some gray around his whiskers with embroidery.  I also added his mouth, nose and ear embroidery. 
one block finished
Here are the 2 blocks next to each other, one finished, one still needs the embroidery.
with and without embroidery

As this posts, I'm working on the 2nd block's embroidery, and should be done later today. 

There were 124 pieces of fabric in each Smee block.  Of course I pieced him on a hand crank sewing machine.
1927 Singer 15 hand crank

After the embroidery is done on the 2nd Smee, there is just one more block to finish, Peter Pan himself.  I just need to finish his eyes, then I can put him together. 

Saturday, November 25, 2017

Katie Nana

Back in August, I asked some of the pattern designers on Fandom in Stitches, if they could make up some Peter Pan themed blocks, since I could only find 5 at that time (Peter Pan, Captain Hook, Smee, Tinkerbell and Tick Tock the Crocodile).  Only one girl in that group.  I asked for Wendy, Tiger Lily and Katie Nana, the dog. 

Kristi Lehane designed Katie Nana for me.  With 'life' happenings, Katie Nana has taken me longer to make than I had thought it would.  There are 205 pieces of fabric in each 10" block. 

I was going along pretty well when I discovered that the fabrics I'd chosen for Katie Nana's cap just weren't working out.  Not enough contrast.  I had to change from the pattern, where Kristi had used blue for the background, since I'd already picked a white on white for all the backgrounds on all of these blocks.  White cap next to a white background just wasn't going to work.  Instead, I'd picked 2 different grays for the cap (main part of cap, and the shadows of the cap).  Here are the pieces that I'd made, by the time I discovered that my gray's just were not working out.
finished and unfinished pieces

you can tell that there just isn't enough contrast with the grays

Back to the printer, to print out all those pieces again, and back to the fabric stash, to pick new fabrics for Katie Nana's cap.  It was hard to find something that would work with that white on white background.  Here is what I chose.
new cap colors

And here is the completed Katie Nana blocks.
Katie Nana, designed by Kristi Lehane

2 completed Katie Nana blocks

I started these blocks on Tinkerbell, my 1925 Singer 99 hand crank sewing machine, but, I finished these blocks on my 1927 Singer 15 hand crank sewing machine.  Nothing wrong with Tinkerbell, but, the Singer 15 is in the main place in my sewing room, and it was easier to just keep it there, than to keep moving machines.
1925 Singer 99 (3/4 size machine) hand crank, Tinkerbell
1927 Singer 15 hand crank

Hopefully I'll have the last 2 Peter Pan themed blocks finished by the end of this weekend. 


Friday, November 24, 2017

Captain Hook

These Peter Pan themed paper pieced blocks are kicking my behind.  So many teeny tiny pieces to work with.  Since it didn't seem like I was getting anything done, just working on one pattern at a time (making 2 of each pattern) I decided to start working on several different patterns at one time.  

The way I work, I prep as many pieces at one time as I can, then I sew all those pieces, then prep, sew, etc, until all the pieces are done.  When all the pieces for one pattern are done, then I can assemble them, to finish the block.  

Well, working on 4 different patterns at once wasn't as confusing as it sounds.  I only put the wrong 'flesh' color on one piece.  I have a method for keeping things organized as I work.  First, I have a label pinned to the different fabrics, so that I know what block those fabrics go to (the background fabric is the same for all the blocks, so, that one is really easy).  

Then, I have gallon ziplocks, that each set of pattern pieces go into.  Those ziplocks also have a piece of paper in them, that lets me know what pattern is in that ziplock, so that things don't get mixed together.  I only stitch or prep on one pattern set at a time.  So far, it's worked really well.  

Most of the pieces for all the patterns are done.  I'm still working on piecing eyes on 2 patterns.  The eyes have the most pieces, so, they take the most work.  

Yesterday, I finished all the pieces for Captain Hook, and started assembling them into the finished block.  Oops!  I'd made a mistake.  Can you find the mistake I made????
finished Oops! block

pattern

Oops!  Instead of sewing grey fabric for the feather, I'd stitched black.  I use colored pencils to mark what color fabric I need in each spot.  The gray is about the same shade as the black, since I don't want to color really hard each time.  Oops!  I'd mistaken black for gray.  I had to print out new pieces, and start from scratch, to fix my mistakes.  Thank goodness one piece only had 3 fabrics, and the other only had 5 fabrics.  Lots of unstitching, to save the other pieces.
new corrected pieces next to the old, wrong pieces

corrected section next to the wrong section

I finished Captain Hook last night.  
both corrected Captain Hook blocks

Captain Hook can be found on Fandom In Stitches, under Jake & the Neverland  Pirates. Here is a direct link to the pattern. There are 107 pieces of fabric in Captain Hook.  These blocks finish at 10" square.  Captain Hook was pieced on this machine.
1927 Singer 15 hand crank

I just love my hand cranks for paper piecing.  The needle stops exactly where I want it to, instead of going a few more stitches, like an electric machine would.  When you are only getting to stitch a couple of stitches on some of the really tiny pieces, it makes a big difference.  I can also make much smaller stitches with a vintage machine than I can with a modern machine.  With all these tiny pieces, that also makes a big difference.  Every stitch helps. 

I'm almost finished with Katie Nana, that was designed for me.  I'm also working on Smee and Peter Pan.  Hopefully those three will be done in the next day or two.  I do have some embroidery that needs to be done on a couple of these blocks, too.  

I started on this series of Peter Pan themed paper pieced blocks back in August.  These are taking me MUCH longer than I ever expected.  

Back to paper piecing!!!!!  

Wednesday, November 8, 2017

Update on Toy Sewing Machines

I have more information on the Toy Sewing Machines that I posted about yesterday

I have two great reference books on Toy and Miniature Sewing Machines.  These were written by Glenda Thomas.  I found the 2nd book at an Antique store, a few years ago, and ordered the first book a year so so ago.  Both are great books!


By looking at the great pictures in the books, I found that Debbie's Singer 20 is from around 1914.  You can tell by the handwheel.
middle handwheel is from around 1914 (from the book)
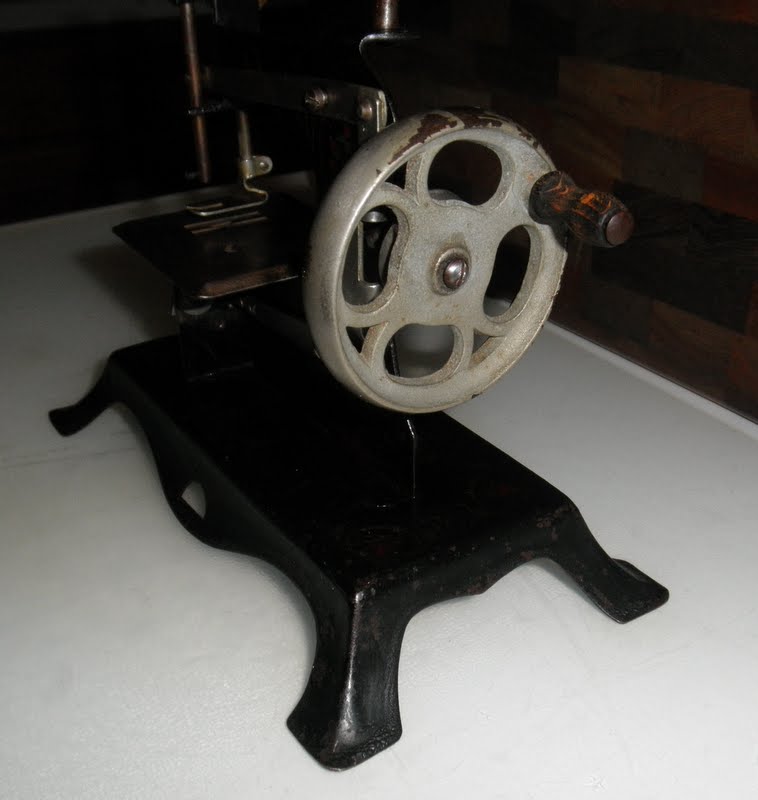
Here is a picture of Debbie's hand wheel.
Debbie's handwheel
It is also easy to tell from this picture, and description:
from the book

from the book
Here is another picture of Debbie's machine.  Check out the tension, in comparison to the picture above.
Debbie's matches the tension from the 1914 machine in the book


I also found information on the toy machine that Carrie gave me.  It is a Casige, made in Germany.
Casige emblem, from the book

picture of the same decal set, from the book

description of same machine, from the book
Here is a picture of my machine, showing the same decal set at the picture above.
front of my machine

back of my machine

This means that my machine is from the 1930's. Casige made Toy machines from 1902 to 1975.  Can you believe that a machine like mine, sold for only 98 cents in 1934? 

The sewing plate on my machine has an imprint stamped on it.  I couldn't get a picture of mine, but, the book had a great picture, and the imprint is the same.
imprint on the sewing plate

I love being able to find information about the machines that I collect.  I wouldn't have been able to find all this info, if it hadn't been for both of these books.  Thank you Glenda Thomas, for all the hard work you did, in writing these books.  What a treasure trove of information.  I highly recommend both of these books.  I've been able to find information on almost every toy machine I have, no matter how tiny.  

I had a few queries about the rust erasers that I use.  My contact has just found them again (they were unavailable for a while), and she is checking on her prices.  One person who asked is a no-reply blogger, thus, I can't send her the info.  If you are no-reply PLEASE include your email address, so that I can respond to you. 


Tuesday, November 7, 2017

Debbie's Machine, and a Gift

I offered to clean up Debbie's grandmother's Singer 20 toy machine.  These were one of the few toy sewing machines that actually worked well.  I know of one woman who takes her Singer 20 on trips, and sews with it on the airplane.  She just clamps the machine to the tray table.  The Singer 20 is a chain stitch sewing machine.

Here are some pictures of Debbie's machine before I started cleaning it.
Debbie's Singer 20


This machine did have some rust on it, but, overall, it was in pretty good shape.  I took my rust eraser and some steel wool after the rusty parts. 

Here is what the rust eraser can do to the chrome plate.
half cleaned

fully cleaned


Here is the cleaned up machine, with the before and after photos.
before, see the rust on the gear towards the bottom?

rust cleaned off the bottom gear (and other places)

rust on the hand wheel

most of the rust cleaned off the hand wheel

before cleaning


after cleaning

Not all machines can be cleaned up this well.  I hope Debbie is pleased with this.  She will still need to find a handle for the hand wheel (missing when I got the machine).


A friend gave me a toy machine yesterday.  I decided to clean it up after I finished Debbie's machine.  This machine was in much worse shape than Debbie's, so, it didn't clean up nearly as well.  Too much of the chrome was already gone.  Still, I think it is an improvement.  It's such a cute little machine. 
my new toy machine, before any cleaning


 I haven't had time to look this machine up, so, sorry, no info on it yet.  Aren't the decals great?!?!

Here are some before and after photos.
before cleaning
after cleaning
before
after
I had to almost completely disassemble this machine to clean the parts.  It still needs more cleaning, but, this is all it will get for a while.
before

before

after cleaning

back, after cleaning


I just love those decals.  Such a cute little machine.  Thanks Carrie!