 |
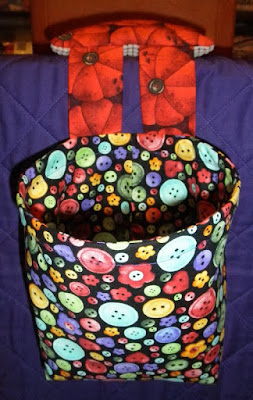
| pin cushion thread catcher |
Usually, when I make these, I make several at at time. These are very popular at my Family Reunions, with all the stitchers.
Supplies Needed:
1 Fat Quarter for Thread Caddy
1 Fat Quarter for Pin Cushion
1-2 cups Play Sand or Crushed Walnut Shells
19"-20" Package Strapping
Non-Slip Shelf Liner
Cutting Directions:
Thread Catcher Fabric - cut 2 - 9"x18" pieces
Pin Cushion Fabric - cut 2 - 6"x8" pieces, cut 1 - 4"x7" piece for straps
Non-Slip Shelf Liner - cut 1 - 3.5"x6" piece
USE 1/4" SEAMS!
 |
| Walnut Shells |
You can get this at pet stores.
 |
| Package Strapping |
Ask at stores if they have any strapping that they haven't thrown away yet. I usually get mine at Sams, or, hubby brings it home from the office.
Strap Construction:
Fold 4"x7" strap fabric, right sides together, and stitch on the 7" side.
 |
| stitch along the 7" side |
Turn right side out and press seam along the center.
Cut strap in half, creating two 3.5" straps. Lay aside.
 |
| cut in half |
Pin Cushion and Lining Construction:
Layer lining fabric to wrong side of the pin cushion fabric (I use the same color fabric for both parts).
 |
| lining fabric against wrong side of pin cushion fabric |
Place shelf liner along one 6" end of pin cushion fabric. Place both straps, seam side
against top of shelf liner, about 1" from the edges, and baste.
 |
| pin shelf liner & straps (seams against shelf liner) |
 |
| baste along edge (less than 1/4") |
|
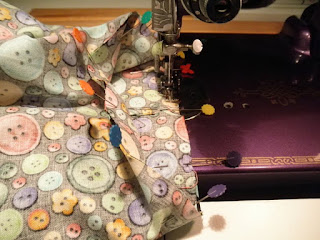
Fold straps in half and pin (see picture below). This will keep them out of the way when you zig zag stitch the other end of the shelf liner to the pin cushion fabric (I use a straight stitch machine, so, I stitch 2 lines of stitching instead of using a zig zag).
Pin shelf liner to fabric in several places, since the shelf liner will want to 'walk' with your sewing foot. *(You can also put a piece of paper over the shelf liner, making sure to tear it off after you have stitched the end. The paper will only tear easily if you straight stitch, not zig zag). **Make your stitch length small so that the paper tears away easily.
 |
| pin well, since the shelf liner 'grabs' your sewing foot |
 |
| stitch close to edge of shelf liner |
 |
| **you can use paper along the edge, so that the shelf liner doesn't 'grip' your sewing foot |
Fold pin cushion fabric, right sides together, to measure 4"x6". The straps will be on the inside.
Sew all three sides, leaving a 3" opening along one 4" side. This is where you will place the sand at the very end of constructing your project.
 |
| leave a 3" opening on the side |
Turn right side out. Set aside.
 |
| top of finished pin cushion |
 |
| bottom of pin cushion |
Thread Catcher Construction:
Fold one 9"x18" piece of bag fabric, right sides together, and stitch along the 9" side, creating a tube.
 |
| stitch along 9" side |
Press and refold so seam is centered along the back.
 |
| seam centered along the back |
Sew along the bottom edge.
 |
| sew along bottom edge |
Square the bottom by bringing the bottom up to the side seam, creating a triangle. Mark seam line.
 |
| bring bottom up to the side seam |
 |
| measure 1.5" from the point, mark the line to stitch |
 |
| stitch along line |
Trim to 1/4".
 |
| trim to 1/4" |
Repeat with the other side.
 |
| bottom of bag with boxed ends |
 |
| turn right side out. |
Repeat with the bag lining, leaving a 4" opening along the center of the long seam.
 |
| leave 4" opening in center of seam |
Pin right sides of straps to right side of lining, along the back. Baste.
 |
| right side of straps against right side of lining (piece with open seam) |
 |
| baste (less than 1/4" from edge) |
Place outer fabric inside lining, right sides together, matching and pinning raw edges. Sew.
 |
| pin right sides together, lining up seams |
 |
| pin well |
 |
| sew |
 |
| sewn seam |
Turn through opening in lining. Press seam.
 |
| press seam |
 |
| press seam |
Insert package strapping.
 |
| insert strapping thru unstitched seam |
Pin strapping WELL!
 |
| pin well before sewing |
Sew as close to the edge of the strapping as you can, starting and stopping at the back seam, by the straps.
 |
| stitch close to strapping |
Stitch lining closed by hand.
Fill pin cushion with sand. Sew the opening closed by hand, using small stitches.
*I find it easier to fill if I use a funnel.
You've finished your pin cushion thread catcher. Enjoy!
|
| finished pin cushion thread catcher |
**I use a straight stitch machine. I have a 1/4" foot for my machine.
 |
| regular foot, and 1/4" foot |
I switch between both feet for this project. If you look closely at the pictures, you can tell which foot I'm using. The regular foot is great for basting close to the edge (less than 1/4") and for stitching close to the strapping.
s


